The Epson RX420 & RX425 Resetter is an adjustment program software created with the primary purpose of cleaning the Waste Ink Pad Counter on the Epson Stylus Photo RX420 and RX425 printers. By cleaning the Waste Ink Pad Counter, the printer can be used in emergency situations, because if the Waste Ink Pad Counter is full, the printer will not be able to function.
Even so, using a resetter should not be done carelessly; there are things that need to be considered. Below, we will provide guidelines for the correct and proper use of the Epson RX420 and RX425 so that you can achieve the best results when using the resetter. We will also provide a download link where you can obtain this resetter.
Table of Contents
- What is an Epson RX420 Resetter?
- Why do the Epson RX420 & RX425 Need a Resetter?
- Signs Your RX420 Needs Resetting
- How to Use Epson RX420 & RX425 Resetter
- Download Epson RX420 & RX425 Resetter Here
What is an Epson RX420 & RX425 Resetter?
An Epson RX420 resetter is a small software utility, often referred to as an adjustment program or reset tool. Its primary function is to communicate directly with the printer’s firmware to reset the waste ink counter back to zero. This counter is not a physical part but a software log that keeps track of how much ink has been used during cleaning cycles and other maintenance operations. When the counter reaches its maximum value, it triggers a shutdown to prevent potential ink overflow. The resetter tool clears this log, allowing the printer to function normally again. It’s important to note that this software is typically developed by third parties, as Epson does not officially provide it to consumers, intending for printers to be serviced by authorized technicians.
Why do the Epson RX420 & RX425 Need a Resetter?
During normal operation, whenever you print, clean the print heads, or perform an alignment, a small amount of ink is used to flush the print heads and keep them clear of clogs. This excess ink is diverted into a small absorbent pad or foam, known as the waste ink pad or reservoir, located inside the printer.
To prevent this pad from over-saturating and potentially leaking ink onto your floors or damaging the printer’s internal electronics, Epson programmers set a conservative limit within the printer’s software. Once the estimated ink volume absorbed by the pad hits this limit, the printer will lock itself and display a service error. A resetter does not replace the physical pad; it simply tells the printer that the counter has been “serviced,” allowing you to continue using the printer. For long-term use, physically replacing the saturated waste ink pads is highly recommended.
Signs Your RX420 Needs Resetting
Several clear indicators that your Epson RX420 has reached its waste ink counter limit. The most common sign is the appearance of error messages such as “Service required”, “A printer’s ink pad is at the end of its service life”, or “The printer’s ink pads need to be replaced.” These messages appear on your computer screen when attempting to print.
You might also notice that your printer’s power light blinks in specific patterns, often alternating between different colors or showing continuous flashing sequences. The printer may refuse to respond to print commands entirely, even though it powers on normally and appears mechanically sound.
How to Use Epson RX420 & RX425 Resetter
1. Before downloading and using the Epson RX420 and RX425 Resetter, it’s advisable to temporarily disable your antivirus. This is to ensure that the reset process runs smoothly. Additionally, make sure the printer is turned on and connected to the computer.
2. You can download the Epson RX420 & RX425 Resetter through the link provided below this article.
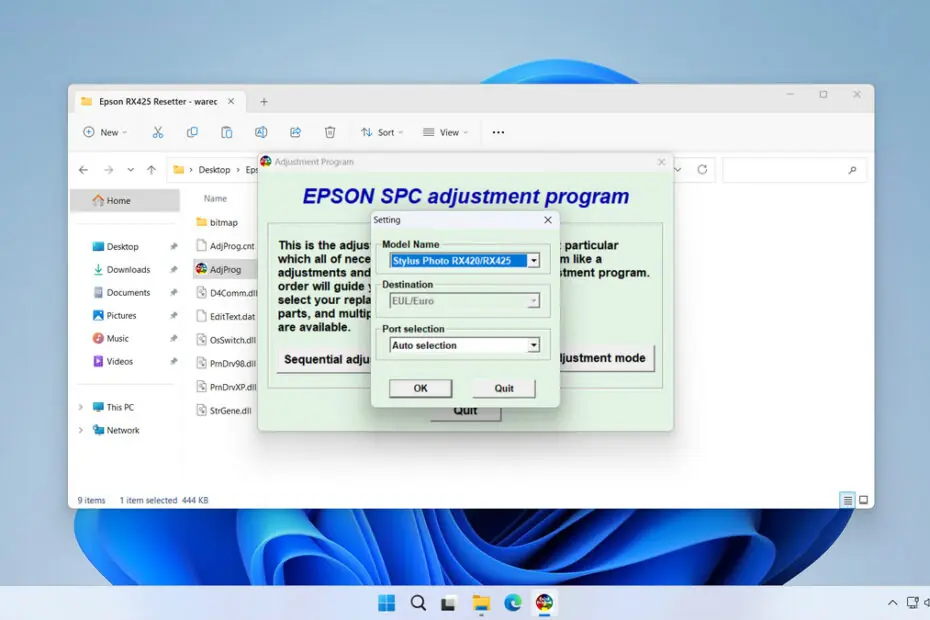
3. After the resetter file is downloaded, extract the file and then open the extracted folder and run the AdjProg.exe file.
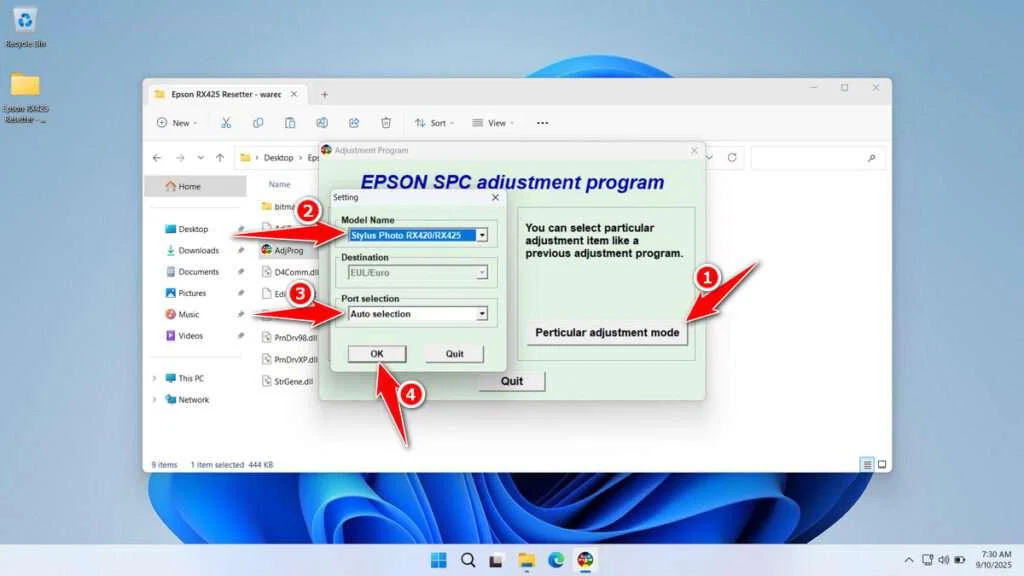
4. Click on the Particular adjustment mode, select the printer model to Epson RX420/RX425, then choose the port automatically, or you can select it manually, then click OK.

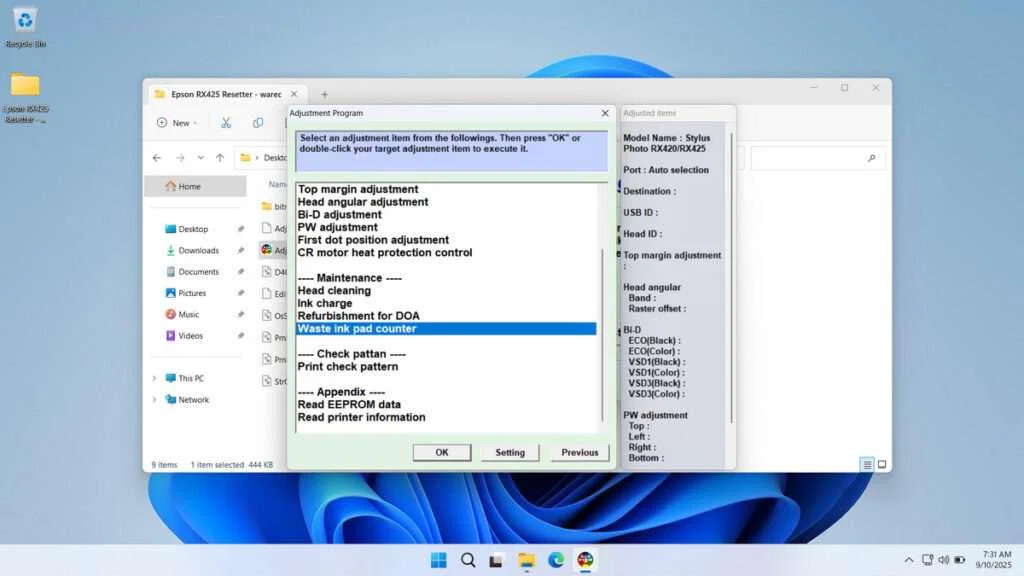
5. Select the Waste Ink Pad counter, then click OK.

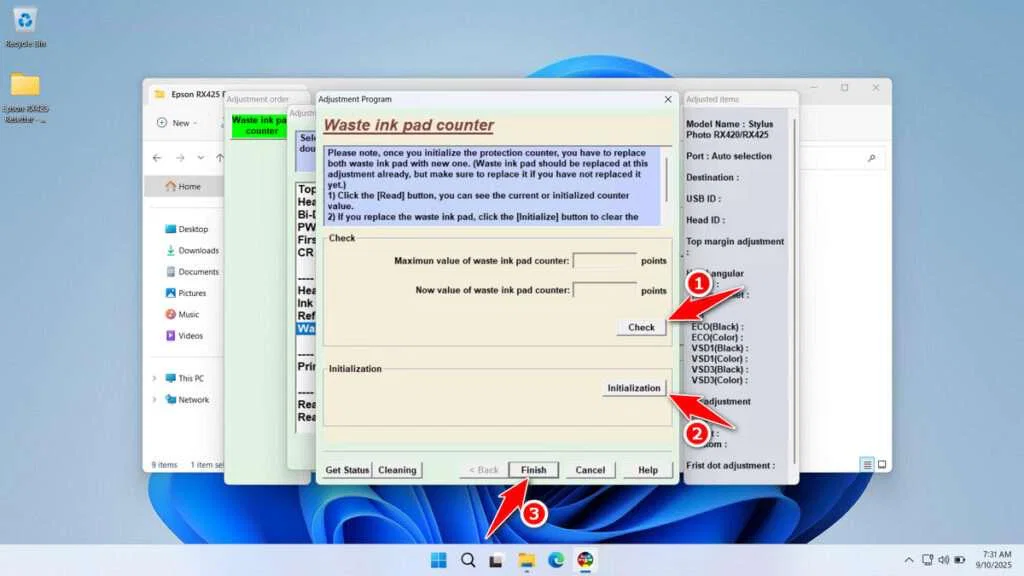
6. Click Check, then proceed by clicking Initialization. After the reset is successful, click Finish. Turn off the printer immediately, and then you can turn your printer back on afterward.

7. If the reset process fails, you can try moving the printer’s USB cable to another available port on the computer. Then you can repeat the reset process.
Download Epson RX420 & RX425 Resetter Here
Resetting the counter does not clean or replace the full waste ink pad. Ignoring the physical pad can eventually lead to ink leakage, which can damage your printer’s internal mechanics and circuitry. It is a good practice to check the pad’s condition and replace it if it is heavily saturated.
All the explanations on how to use the Epson RX420 & RX425 have been provided so you can use the resetter with full caution. For those who need the Epson RX420 & RX425 Resetter, you can download it through the following link.
File Size: 0.5MB
File Type: .ZIP
OS Support: Windows 7/8/10/11 or higher
Maybe you would like other interesting articles?

