The Epson Stylus Photo 1410 is a beloved workhorse for photographers and creative professionals, renowned for its exceptional color reproduction and ability to handle large-format prints. However, like many Epson printers, it utilizes internal counters that can trigger frustrating “service required” or “ink pad full” errors, effectively halting your printing projects. This is where the Epson Stylus Photo 1410 Resetter becomes an indispensable tool. This guide dives deep into what the resetter is, why you need it, how to use it, and how it can breathe new life into your trusted printer, saving you significant time and money on unnecessary service calls or premature replacements.
Table of Contents
- What is the Epson Stylus Photo 1410 Resetter?
- How the Epson 1410 Resetter Works Its Magic
- Crucial Safety Precautions When Using a Resetter
- How to Use Epson Stylus Photo 1410 Resetter
- Download Epson Stylus Photo 1410 Resetter Here
What is the Epson Stylus Photo 1410 Resetter?
The Epson Stylus Photo 1410 Resetter isn’t a physical tool you plug in, but rather a specialized software program designed to communicate directly with your printer’s internal maintenance system. Its primary function is to reset the waste ink pad counter. During normal operation, every time your printer cleans its printheads or ejects ink during maintenance cycles, a small amount of residual ink is absorbed into a felt pad (the waste ink pad) inside the printer. The printer meticulously tracks this accumulation. Once the software estimates that the pad is nearing its capacity, it triggers an error message (such as “Service Required” or “Parts inside your printer are near the end of their service life”) and prevents further printing. The resetter software tells the printer to reset this internal counter back to zero, effectively clearing the error and allowing printing to resume. It’s vital to understand that the resetter doesn’t physically clean or replace the waste ink pad itself; it simply resets the software counter.
How the Epson 1410 Resetter Works Its Magic
The resetter software works by sending specific commands to the printer’s service mode:
- Initialization: The software establishes a connection with the printer, often requiring the printer to be put into a specific service mode (usually by holding down certain buttons while powering on).
- Reading Counters: It reads the current value of the waste ink counter(s).
- Resetting: Upon user command, it sends the reset instruction, setting the waste ink counter(s) back to zero.
- Confirmation: It typically provides feedback (on-screen messages, blinking lights on the printer) indicating a successful reset.
- Clearing Errors: After resetting and power cycling the printer, the “service required” error disappears, and normal printing functionality is restored. Remember: The physical ink pad remains unchanged and will eventually need attention.
Crucial Safety Precautions When Using a Resetter
- Physical Ink Pad Condition is Key: The resetter only resets the software counter. It doesn’t empty or replace the physical waste ink pad. If the pad is physically saturated (you might see ink leaking inside the printer or smell ink strongly). Continuing to use an overflowing pad risks severe internal damage, electrical shorts, and ink spills. Inspect the pad area periodically or be aware of signs of leakage.
- Eventual Pad Replacement: After several resets (or if leakage occurs), the waste ink pads MUST be physically replaced. This can be a DIY project (kits are available) or done by a technician.
- Use Correct Version: Ensure the software is specifically designed for the Epson Stylus Photo 1410. Using the wrong resetter can cause malfunctions.
- Follow Instructions Precisely: Incorrectly entering service mode or using the software can potentially cause issues. Read the provided manual carefully.
How to Use Epson Stylus Photo 1410 Resetter
1. Before you download and use the resetter, be sure to temporarily disable your antivirus. Also, make sure the printer is on and connected to the computer with the printer cable.
2. You can download the resetter via the link below this article.
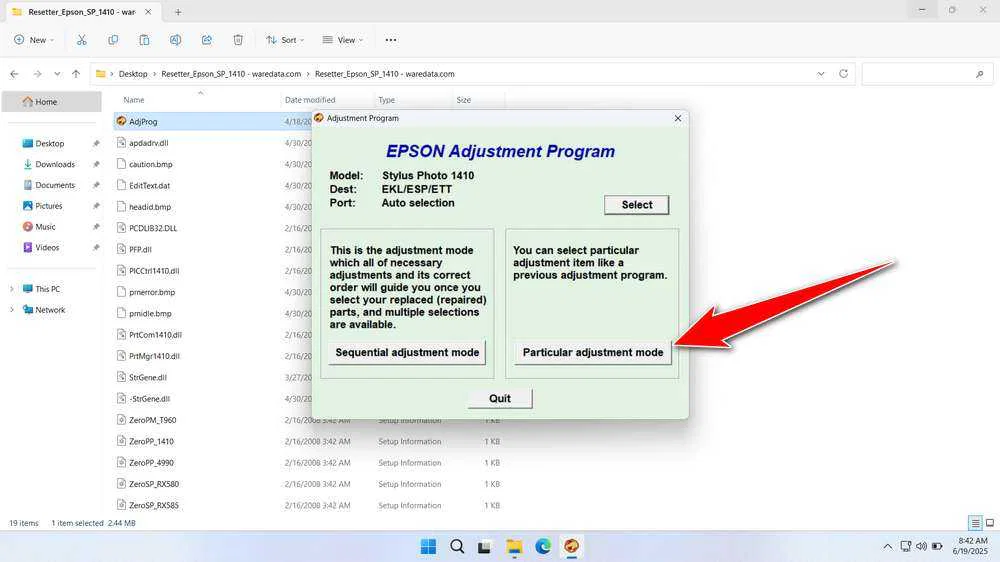
3. After the file is downloaded, extract the file by right-clicking and selecting “Extract All”. Then, open the resetter folder and run the “AdjProg.exe” file, then click “Accept”.
4. Click on “Particular adjustment mode”.

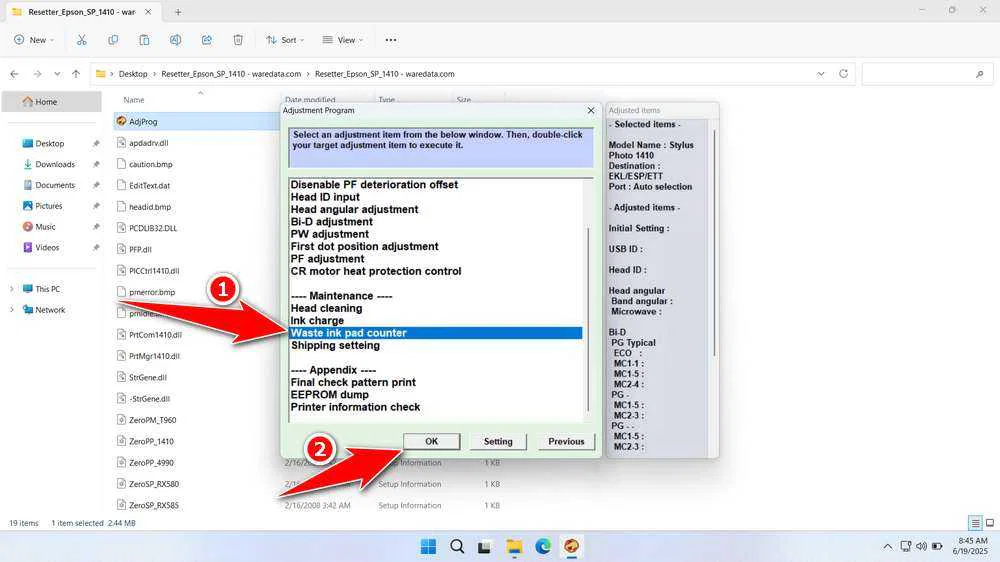
5. Select “Waste ink pad counter” in the Maintenance option. Then click “OK”.

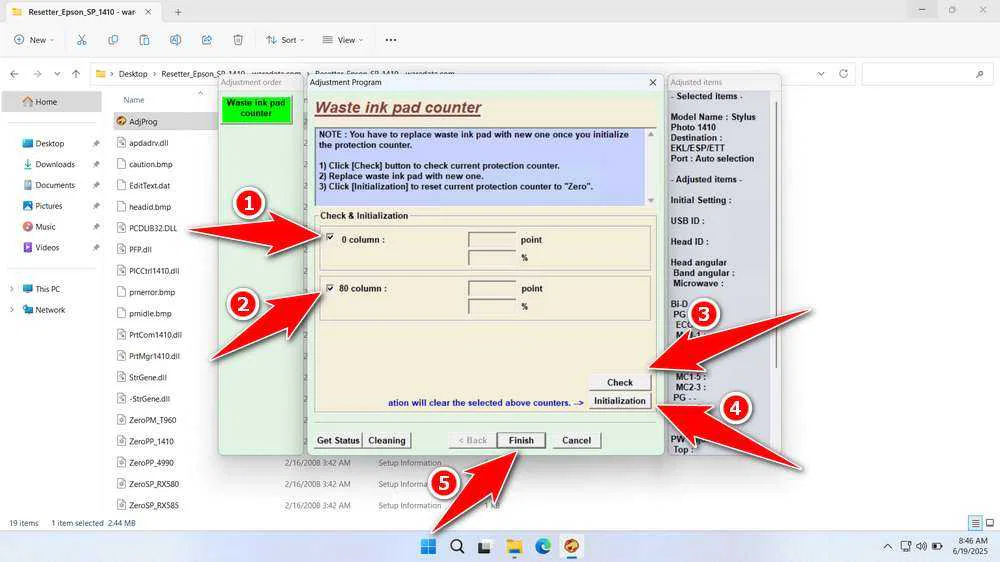
6. Check the “0 Column” and “80 Column” options. Then click the “Check” button, and continue by clicking “Initialization”. When finished, click “Finish”.

7. If an error occurs, try repeating the steps, make sure the printer is connected, and also use other available ports.
Download Epson Stylus Photo 1410 Resetter Here
The Epson Stylus Photo 1410 Resetter is a specialized software tool designed to reset the internal error counters of the printer. It can clear various error messages, such as “Service Required” or “Parts inside your printer are near the end of their service life,” or other ink-related alerts. Essentially, it helps to restore the printer’s factory settings related to ink management without requiring hardware repairs.
But even so, you still need to check the condition of the printer hardware to prevent ink from coming out of the printer and dirtying your workplace. So you should use the resetter with responsibility and discretion.
For those of you who need the Epson Stylus Photo 1410 Resetter, you can download it via the following link.

