The Epson Stylus Photo R200 & R210 is a printer designed for photo enthusiasts and home users, renowned for its excellent print quality and capabilities for printing on CDs/DVDs. However, like many Epson printers, it features a built-in waste ink counter designed to estimate when the internal pads that absorb residual ink during cleaning cycles become saturated. When this counter reaches its limit, the printer enters a protection mode, halting operations and displaying an error (often “Service Required” or “Parts Inside Printer Near End of Life”). This is where the Epson Stylus Photo R200 Resetter to be useful. This software tool allows you to reset the waste ink counter, effectively clearing the error and restoring the printer to working order without needing expensive service center visits or premature replacement. Understanding what the resetter is, why it’s necessary, and how to use it safely is crucial for extending the life of your R200.
In this article, we will only mention the Epson Stylus Photo R200, although it can actually also be used for the R210 version.
Table of Contents
- What is the Epson Stylus Photo R200 Resetter?
- Why the Waste Ink Counter Needs Resetting?
- How Does the R200 Resetter Software Work?
- How to Use Epson Stylus Photo R200 Resetter
- Download Epson Stylus Photo R200 & R210 Resetter Here
What is the Epson Stylus Photo R200 Resetter?
The Epson Stylus Photo R200 Resetter is a small, specialized software program designed specifically for this printer model. Its primary function is to communicate directly with the printer’s internal memory chip that tracks waste ink accumulation. When executed correctly, the software resets the stored count value for the waste ink counter back to zero. It doesn’t physically clean or remove the actual waste ink absorbed by the pads inside the printer; its role is purely electronic, clearing the software-based limit that triggers the shutdown error. Think of it as telling the printer, “Start counting the waste ink again from scratch.”
Why the Waste Ink Counter Needs Resetting?
Epson printers incorporate waste ink absorption pads (sponges or felt) located inside the printer casing. These pads capture ink expelled during essential maintenance routines like printhead cleaning and nozzle checks. The printer’s firmware includes a counter that estimates how much ink has been deposited into these pads based on the number and type of cleaning cycles performed. Once this estimated value reaches a predetermined threshold set by Epson, the printer locks itself. This is a safety feature intended to prevent potential ink overflow inside the machine, which could cause damage. However, the counter often triggers before the physical pads are truly saturated, especially with moderate home use. Resetting the counter allows you to continue using the printer once the physical pads have been checked or replaced.
How Does the R200 Resetter Software Work?
The resetter software typically operates via a USB connection between your computer and the printer. It sends specific, low-level commands recognized only by the Epson R200’s service firmware. These commands access the non-volatile memory (NVRAM) where the waste ink counter value is stored and overwrite it with a zero or a much lower value. The process usually requires the printer to be in a specific “service mode” or “programming mode” before the reset command can be successfully executed. Once reset, the printer firmware recognizes the counter as “reset” and clears the service error, allowing normal operation to resume.
How to Use Epson Stylus Photo R200 Resetter
1. Before you use and download the Epson Stylus Photo R200 Resetter, it is advisable to temporarily disable all antivirus software on your computer. This is done to prevent detection errors from the antivirus on your computer, so that the reset process can run smoothly.
2. After that, you can download the Epson Stylus Photo R200 Resetter through the link below the article.
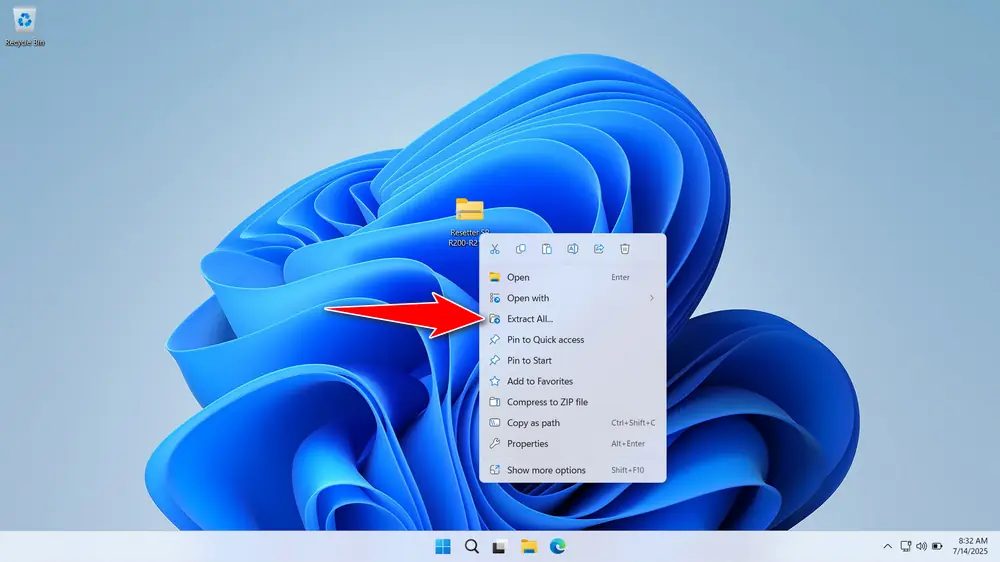
3. After you download the file, please extract the file by right-clicking on the file and then selecting Extract All.

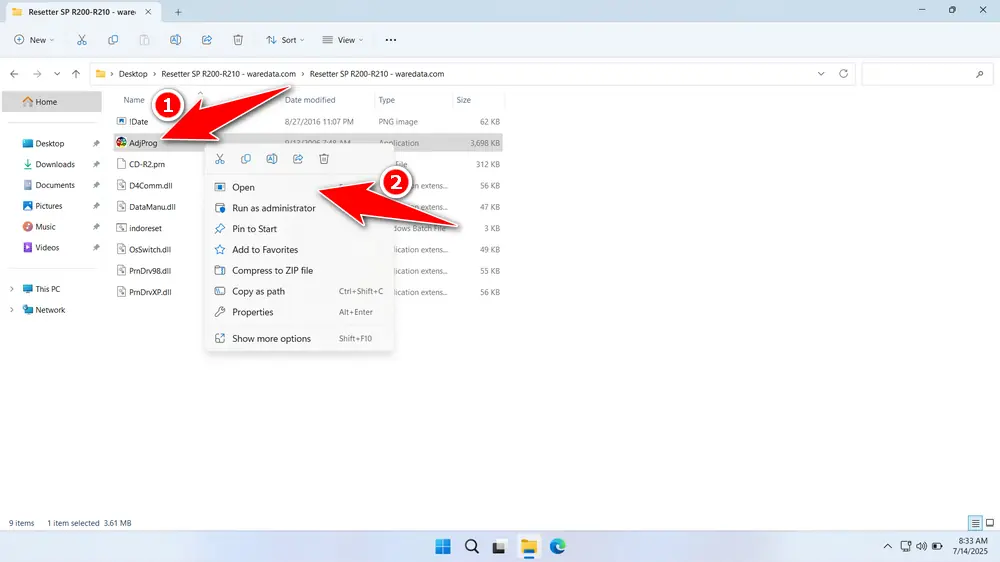
4. After the file is extracted, open the resetter folder and run the resetter program by double-clicking on the AdjProg.exe file.

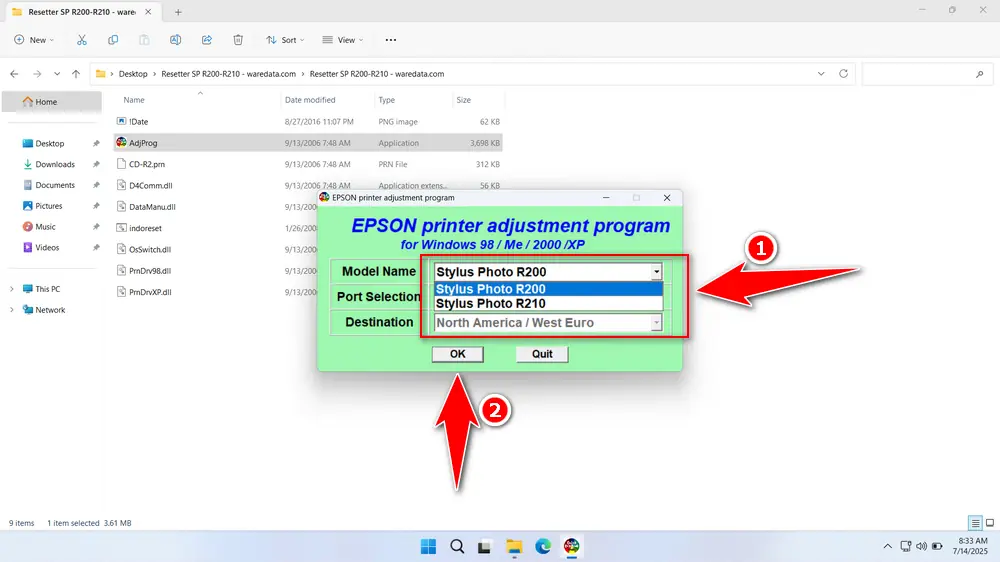
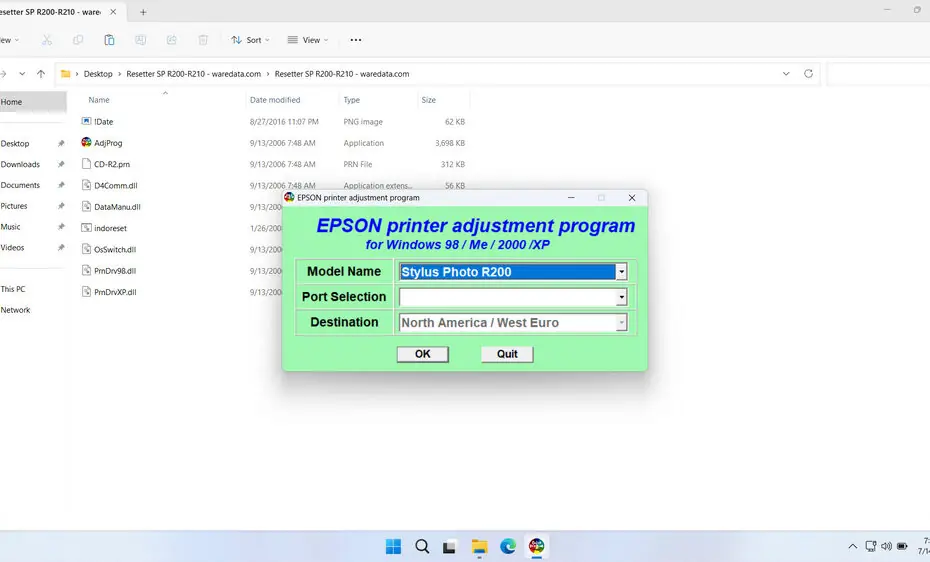
5. Choose your printer model, then select its port as well. The port can only be detected if you have connected the printer to the computer using the printer’s USB cable. Then click “OK”.

6. Select the ‘Waste ink pad counter’ afterwards. Then click ‘OK’.
7. Tick the option ‘Main pad counter’, then click the ‘Check’ button, followed by clicking the ‘Initialize’ button. After the reset is successful, click the ‘Finish’ button. You can turn off the printer afterwards. Then you can turn your printer back on.
8. If the reset process fails, you can try moving the USB printer to another available port on your computer. Then you can try the reset process again.
Download Epson Stylus Photo R200 & R210 Resetter Here
Crucially, resetting the counter does NOT remove the actual waste ink. Before resetting, you must inspect the physical waste ink pads inside the printer. If they are visibly saturated or leaking, resetting alone is dangerous and can lead to ink spills inside the printer, causing severe damage. Pad replacement or professional cleaning is necessary first.
If you already know the function of the resetter, how to use it while anticipating its risks. You should be able to use the resetter more carefully to achieve the expected repair results for the printer.
If you need the Epson Stylus Photo R200 & R210 Resetter, you can download it through the following link.
File Size: 833KB
File Type: .ZIP
OS Support: Windows 7/8/10/11 or higher
Maybe you would like other interesting articles?

