
Epson L6170 resetter is a software adjustment program that can be used to reset an Epson L6170 printer. By using this resetter you will very easily solve error problems such as “Service required” when the printer is used.
The resetter for the Epson L6170 printer can only be run on Windows OS with a minimum of Windows 7 or above. You can use a resetter for the Epson L6170 printer not only to solve the “Service required” problem but also to do other maintenance such as checking the Nozzle and also resetting the position of the printer head.
Resetter for Epson L6170 printer you can use unlimited and without limitations. You can even use a resetter for the Epson L6170 printer on many PCs at once if you need it.
How to Reset Epson l6170?
1. Before you download the resetter, first disable antivirus including Windows defender realtime protection and also tamper protection for Windows 10 and Windows 11. This is so that the resetter is not removed antivirus due to a detection error.
2. You can download the resetter for the Epson L6170 printer link at the bottom of this article. There are two servers that you can choose to download the resetter file.
3. After you download the Epson L6170 resetter you must extract the file with right click choose Extract here. In the folder that you have extracted there is a file named “AdjProg L6160, L6170, L6176 & L6190.exe“. Run the file then it will open a pop up and you just have to press the Ctrl + C keys on your keyboard and copy only the Hardware ID that has appeared.
4. Go to the Keygen folder, inside which there is a file named “WLGen_L6160, L6170, L6176 & L6190.exe“. Run the file and please click “License Manager“ button. Click “Add License“, Fill in the data, you can fill in anything except in the Hardware ID section enter the Hardware ID as you copied it before, then click “Save“ button. Click “Create License Key“ to generate a license file.
5. A folder will be created in the same place, copy the entire contents of the files in the folder and paste it in the same place as the resetter you are in. Then you will be able to run the resetter for the Epson L6170 printer smoothly..
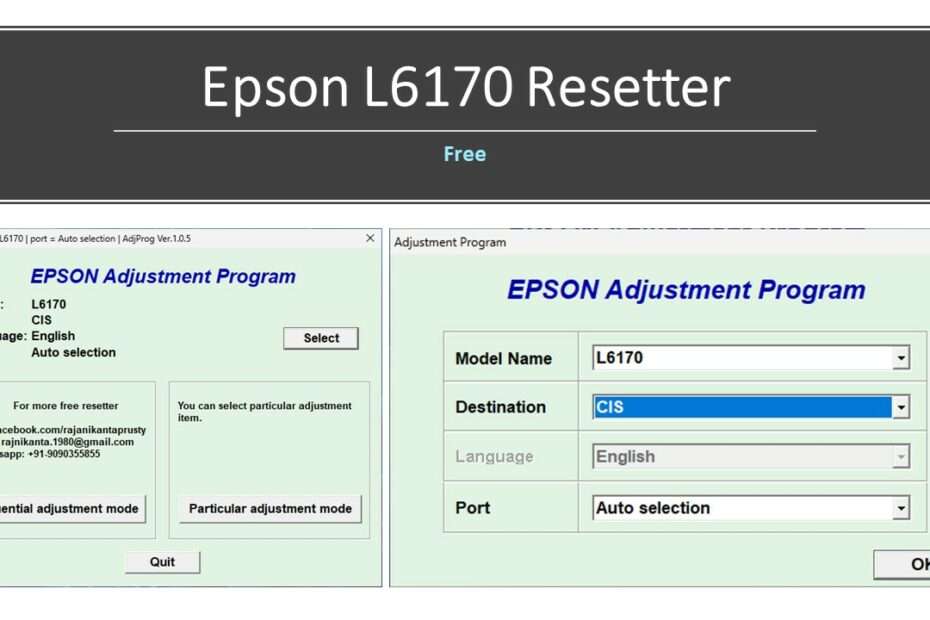
6. After the resetter opens click “Select” button, select the type L6170 then click “Ok“, then you must click “Particular adjustment mode” button, and select “Waste ink pad counter“ option. Click “OK“.
7. Check the “Main pad counter” option, after that click the “Check” button, latter you can click the “Initialize” button.
8. If an error occurs, make sure the printer is connected to the PC and is on. You can also try moving the printer’s USB port to another port on the PC.
9. After you have successfully reset with the resetter, turn off the printer and after that you can turn your printer back on.
FAQ
Why is it that when resetting it doesn’t work?
Make sure the printer and PC are connected correctly, besides that you can try moving the printer’s USB port to another port.
After being reset what printer should be turned off?
Yes, after you have successfully reset, the printer must be turned off then you can turn it back on, this is to get rid of the error message that previously existed.
What operating system should be used?
You can use the resetter for the Epson L6170 on Windows 7/8/10/11 or above.
Epson L6170 Resetter Free Download
Resetter: Epson L6170/L6160/L6176/L6190 Printer
Size: 5.38 MB
Supported OS: Windows 7/8/10/11 or Higher
How to Reset Epson L6170 in Video
If you are still confused about how to reset Epson L6170, you can also watch the following YouTube video.
Thank you very much, it works, and real app, not the fake one. Recommended site. Thanks
You’re welcome.
App freezes whenever check is clicked on waste pad ink counter. You ruined my hopes and dreams.
Make sure all the antivirus is disabled, don’t forget to try another USB port and make sure the printer is on and connected.