Epson printers, including the Stylus Office TX320F, incorporate internal felt pads designed to absorb excess ink generated during routine operations like head cleaning, priming, and printing. A built-in software counter meticulously tracks how much ink these pads have absorbed. Once this counter hits a pre-set threshold defined by Epson, the printer enters a service mode, displaying error messages (e.g., “Service Required,” “Parts Near End Life,” “Ink Pad Full”) and ceases printing. This is a preventative measure to stop potential ink overflow inside the printer, which could cause serious damage. Importantly, this counter expiry is independent of your actual ink cartridge levels.
That’s why a resetter was created that can be temporarily used to clean the waste ink pad counter so that the printer can be used again, while waiting for the pad replacement, when we have free time to replace it.
Below, we will explain in more detail about the function of the resetter, how to use it, and where you can download it.
Table of Contents
- What is Epson TX320F Resetter?
- Common Signs Printer Needs Resetting
- How the Resetter Tool Works
- How to Use Epson TX320F Resetter
- Download Epson TX320F Resetter Here
What is Epson TX320F Resetter?
The Epson Stylus Office TX320F resetter is specialized software (often generically referred to as “Adjustment Program” or “Waste Ink Counter Reset Tool”) designed to communicate directly with the printer’s service area. Its primary function is to:
- Reset the Waste Ink Counter: It clears the accumulated count back to zero, tricking the printer into believing the waste ink pads are “new.”
- Clear Error Codes: It removes the “Service Required” or “Ink Pad Full” error messages triggered by the full counter.
- Reactivate Printing: Once the counter is reset, the printer exits service mode and resumes normal printing operations.
This software is typically developed by third parties and is not an official Epson product. It targets the specific firmware of the TX320F model.
Common Signs Printer Needs Resetting
Here are the typical warning signs that indicate your Epson TX320F needs resetting:
- Error message: “Service Required”, “Parts Near End Life”, or “Ink Pad Full”
- Blinking or flashing lights on the printer panel
- Inability to print despite no visible hardware issues
- Frequent pop-up messages on your computer indicating ink pad issues
How the Resetter Tool Works
The resetter tool operates by establishing a USB connection between your computer and the TX320F printer. Through this connection, the software can access the printer’s EEPROM (Electrically Erasable Programmable Read-Only Memory), where the waste ink counter values are stored.
Once connected, the resetter reads the current counter values and displays them on your computer screen. You can then instruct the tool to reset these counters to zero, effectively convincing the printer that the waste ink pad is empty and ready for continued use.
This process doesn’t actually empty the physical waste ink pad inside your printer. Instead, it resets the digital counter that tracks how full the pad should be based on usage patterns. This is why it’s important to consider the actual physical condition of the waste ink pad when using resetter tools.
How to Use Epson TX320F Resetter
1. Before you use the Epson TX320F Resetter, first make sure the antivirus is temporarily disabled. This is done so that the reset process can run smoothly, and the resetter file is not deleted by the antivirus due to detection errors. Also, make sure the printer is properly connected to the computer.
2. You can download the Epson TX320F Resetter via the link below this article.
3. Extract the resetter file that has been downloaded by right-clicking on the file then selecting Extract All.
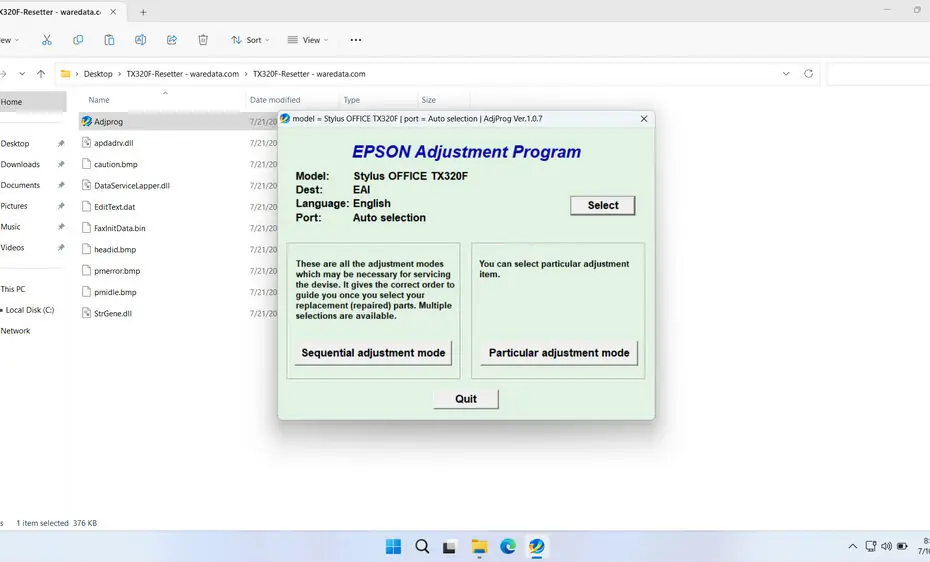
4. Open the extracted folder and run the resetter program by double-clicking on the “Adjprog.exe” file. When the program opens, click “Accept”.
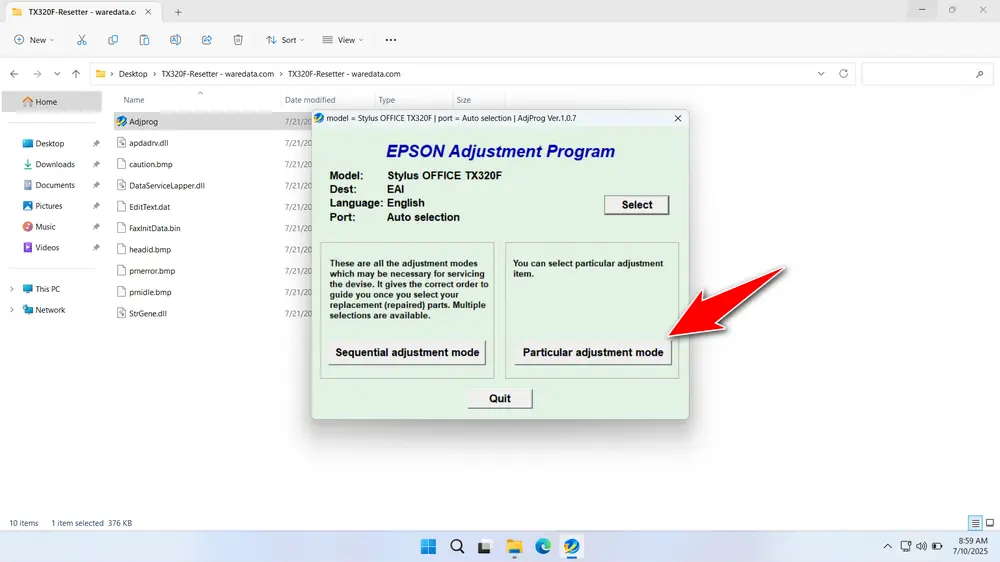
5. Continue by clicking the “Particular adjustment mode” button.

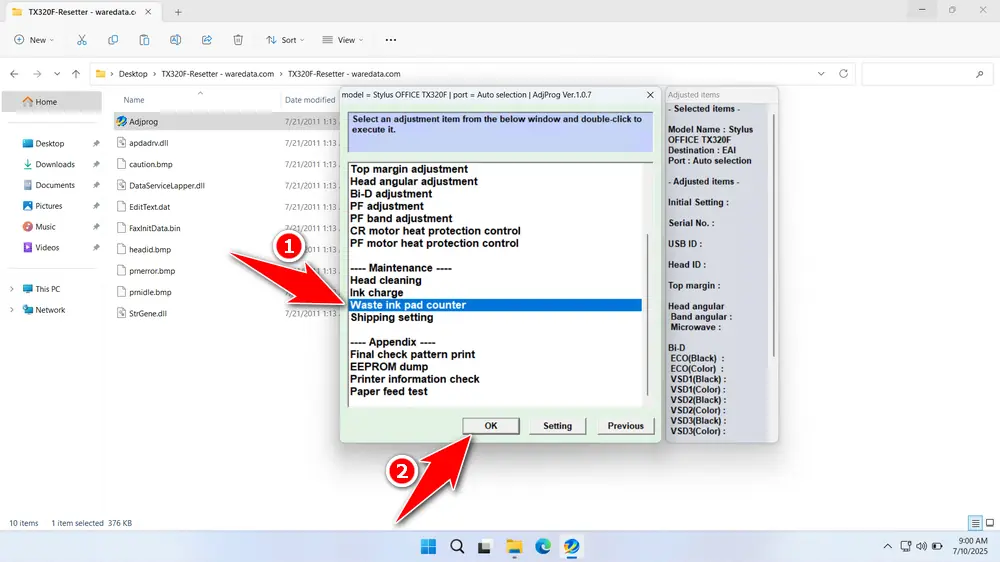
6. Select “Waste ink pad counter” in the Maintenance option, then click “OK”.

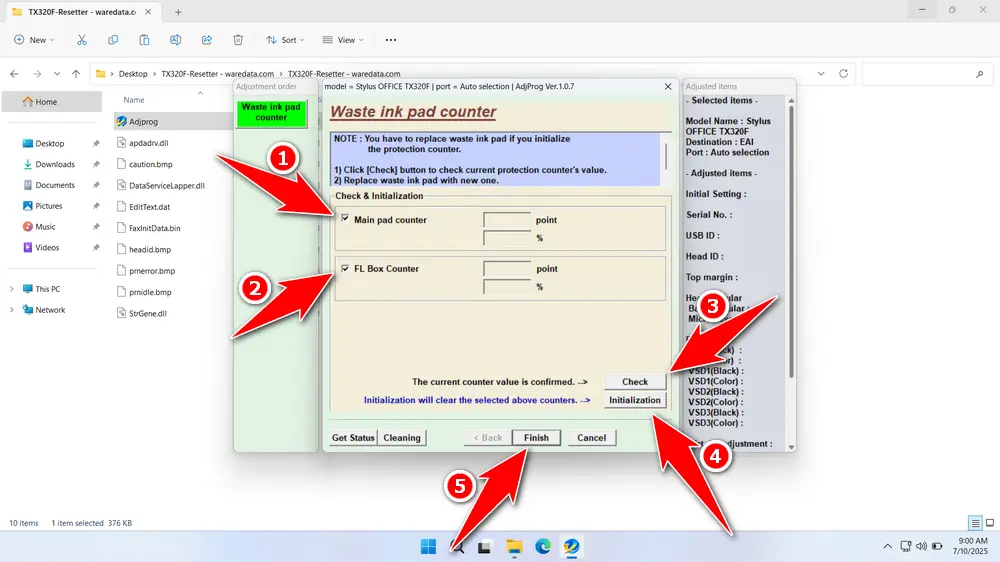
7. Tick on “Main pad counter” & “Platen pad counter”. Then click the “Check” button, then click the “Initialization” button. After a successful reset, click “Finish”. Turn off the printer, and then you can turn it on the printer again.

8. If the reset fails, try moving the USB printer to another available port on your computer. Then try resetting your printer again.
Download Epson TX320F Resetter Here
Resetting only clears the software counter. It doesn’t clean or replace the actual saturated waste ink pads inside the printer. Continued use after resetting without addressing full pads risks severe internal ink leakage, damaging circuit boards, motors, or other components, leading to irreparable failure. Resetting is a temporary software fix, not a hardware solution.
If you already understand what a resetter is, what it does, and how to use it safely, then it is only natural that you use a resetter with caution. You can download Epson Stylus Office TX320F Resetter via the link we provide below.
File Size: 695KB
File Type: .ZIP
OS Support: Windows 7/8/10/11 or higher
Maybe you like other interesting articles?

