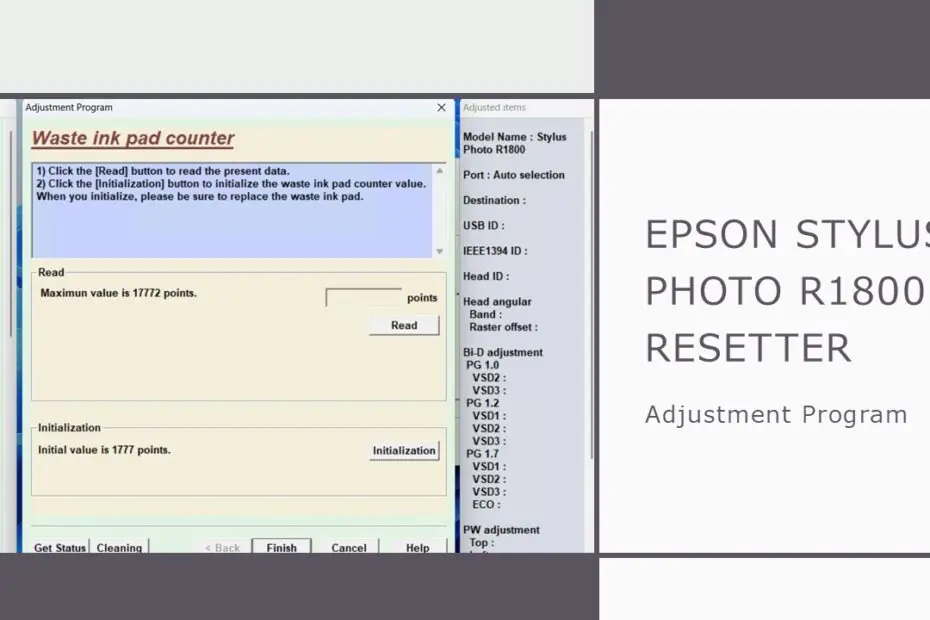
The Epson Stylus Photo R1800 remains a beloved workhorse for professional photographers and serious hobbyists, renowned for its exceptional color accuracy and ability to produce stunning, borderless prints up to 13×19 inches. However, like many Epson printers, it incorporates an internal ink pad counter designed to monitor waste ink saturation. When this counter reaches its limit, the printer enters a protection mode, halting all printing functions and displaying an error message like “Service Required” or “Parts Life End.” This is where the Epson Stylus Photo R1800 Resetter becomes an indispensable tool. This software utility allows you to reset the waste ink counter, effectively clearing the error and restoring the printer to full functionality without the immediate need for costly professional servicing or premature printer replacement. Understanding how and when to use this resetter is crucial for maximizing the lifespan and value of your Epson Stylus Photo R1800 printer.
Table of Contents
- What is the Waste Ink Counter & Why Does it Need Resetting?
- What is an Epson Stylus Photo R1800 Resetter?
- Common Error Messages That Require a Reset
- How to Use Epson Stylus Photo R1800 Resetter
- Download Epson Stylus Photo R1800 Resetter Here
What is the Waste Ink Counter & Why Does it Need Resetting?
Epson printers, including the R1800, feature built-in maintenance routines like head cleaning and priming. These processes generate a small amount of waste ink, which is absorbed into a felt pad (or multiple pads) located inside the printer. To prevent overflow and potential internal damage, Epson engineers a software counter that tracks estimated ink pad saturation. Once this counter reaches a predetermined threshold (typically long before the pads are physically full), the printer locks itself down. The resetter software communicates directly with the printer’s firmware, resetting this internal counter to zero, thereby clearing the error condition and allowing printing to resume. It’s important to note that resetting does not physically clean or replace the waste ink pads; it merely resets the software monitor.
What is an Epson Stylus Photo R1800 Resetter?
A printer resetter, also known as an adjustment program or waste ink counter reset utility, is specialized software designed to reset internal counters and maintenance functions within Epson printers. Understanding why these tools exist requires a deeper look at how modern inkjet printers operate and maintain themselves.
Every time your Epson R1800 prints, performs head cleaning cycles, or conducts automatic maintenance routines, small amounts of ink are diverted to internal waste ink pads. These pads, located inside the printer’s chassis, absorb excess ink to prevent it from contaminating the internal mechanisms or creating messy spills. The printer’s firmware continuously tracks how much ink has been absorbed by these pads through internal counters.
When these counters reach predetermined limits set by Epson’s engineers, the printer assumes the waste ink pads are approaching saturation and triggers a protective shutdown. This safety mechanism prevents potential ink overflow that could damage the printer’s electronics or create environmental hazards. However, the counter limits are often conservative estimates, and the actual waste ink pads may still have considerable absorption capacity remaining.
The resetter tool communicates directly with the printer’s firmware, allowing you to reset these internal counters back to zero. This process essentially tells the printer that fresh waste ink pads have been installed, enabling normal operation to resume. Think of it as resetting the odometer on a car after performing maintenance – you’re updating the printer’s internal records to reflect the current maintenance status.
Common Error Messages That Require a Reset
The Epson Stylus Photo R1800 displays several specific error messages when internal counters reach their limits. Recognizing these messages helps you determine when a resetter tool is necessary versus when other troubleshooting approaches might be more appropriate.
The most common error message is “A printer’s ink pad is at the end of its service life. Please contact Epson Support.” This message appears when the main waste ink counter reaches its predetermined limit. The printer will typically flash alternating red lights on the control panel, and all printing functions will become disabled until the issue is resolved.
Another variation you might encounter is “Service Required” accompanied by specific error codes. These codes can indicate different types of maintenance counter overflows, including separate counters for borderless printing waste ink, regular printing waste ink, and cleaning cycle waste ink. Some users also report seeing messages about “Parts inside your printer are at the end of their service life.”
When these messages appear, the printer enters a protective mode where it refuses to print, scan, or perform any functions until the counters are reset. Simply turning the printer off and on again will not resolve the issue; the counters are stored in non-volatile memory that persists even when the printer is unplugged.
It’s important to understand that these error messages don’t necessarily indicate actual hardware failure. In many cases, the waste ink pads still have significant absorption capacity remaining, and the printer can continue operating normally after a proper reset procedure.
How to Use Epson Stylus Photo R1800 Resetter
1. Before downloading and using the resetter, first deactivate all antivirus software for a while, as this is done to prevent misdetection by the antivirus, so that it will fail to download and use the resetter. Then, make sure that the printer is properly connected to the computer using the printer’s USB cable.
2. You can download the Epson Stylus Photo R1800 Resetter via the link below the article we provide.
3. After you have downloaded the resetter file, you can extract the file by right-clicking on the file and selecting Extract All.
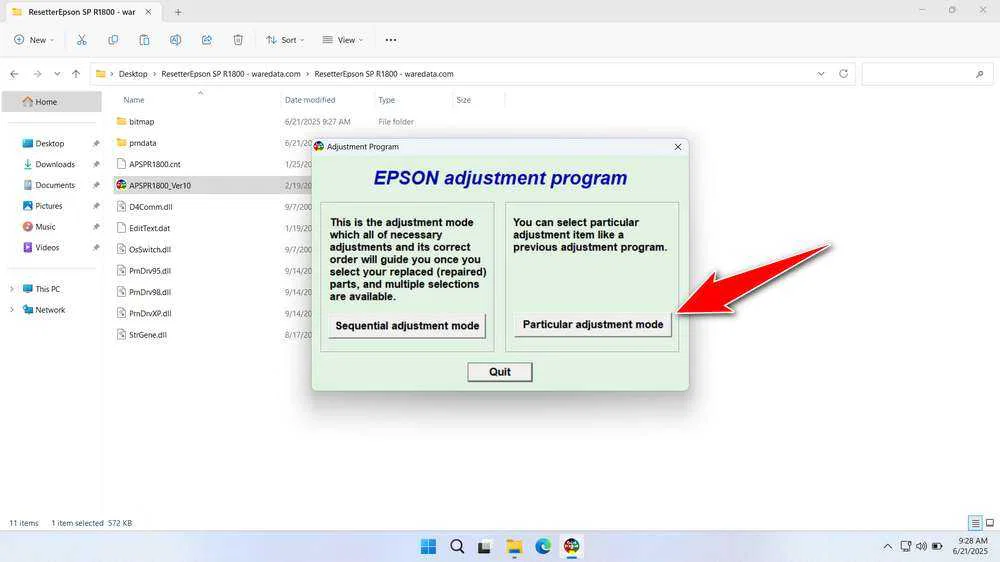
4. Open the extracted folder and run the resetter file by double-clicking on the “APSPR1800_Ver10.exe” file.
5. Once the program is open, continue by clicking the “Particular adjustment mode” button.
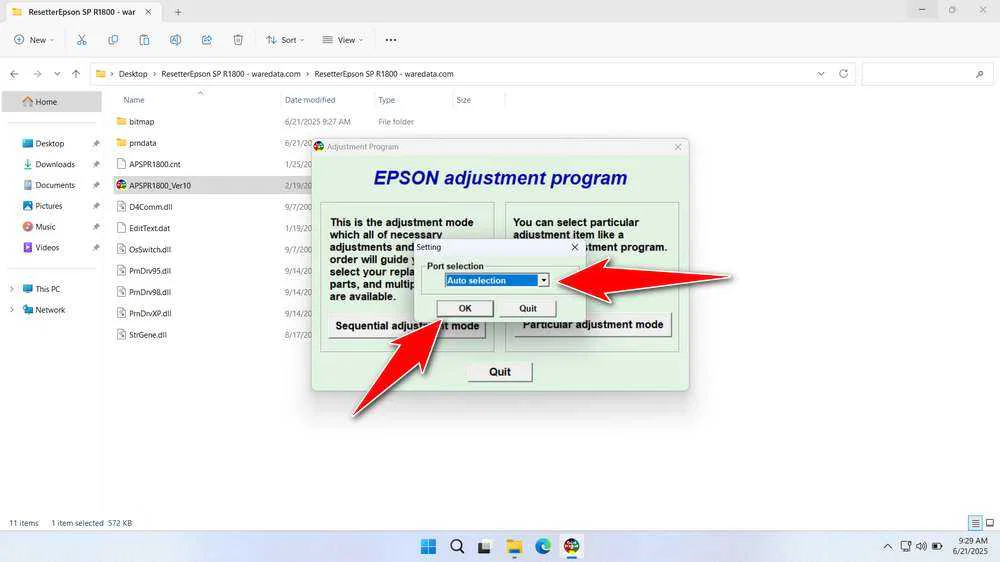
6. A pop-up will appear, please select the port you are using, or you can also select “Auto Selection”. Click “OK” afterwards.
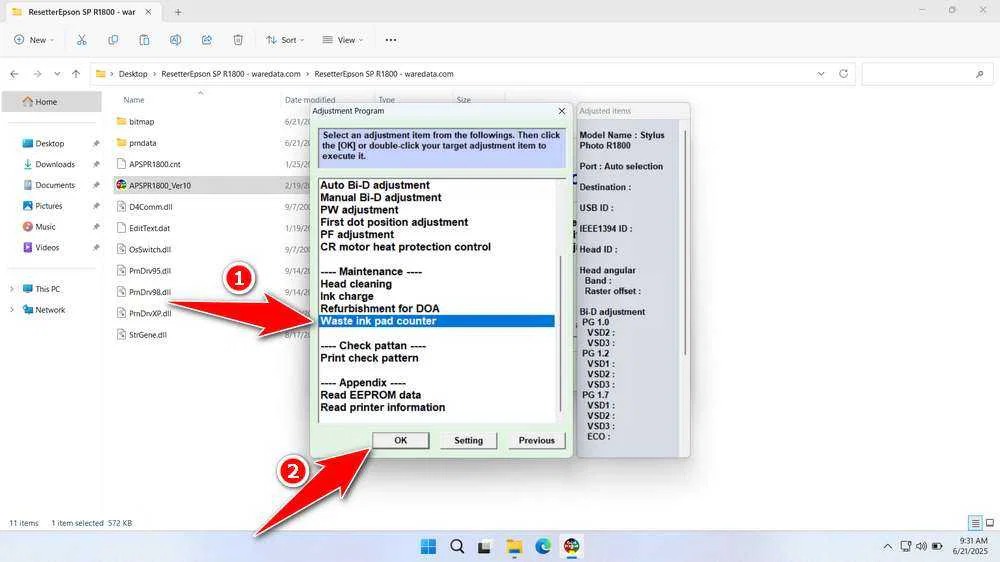
7. Select “Waste ink pad counter” under maintenance, then click “OK”.
8. Click the “Read” button, then click the ‘Initialization’ button, after successfully clicking “Finish”. You can turn off the printer afterwards, and then the printer can be turned on again.
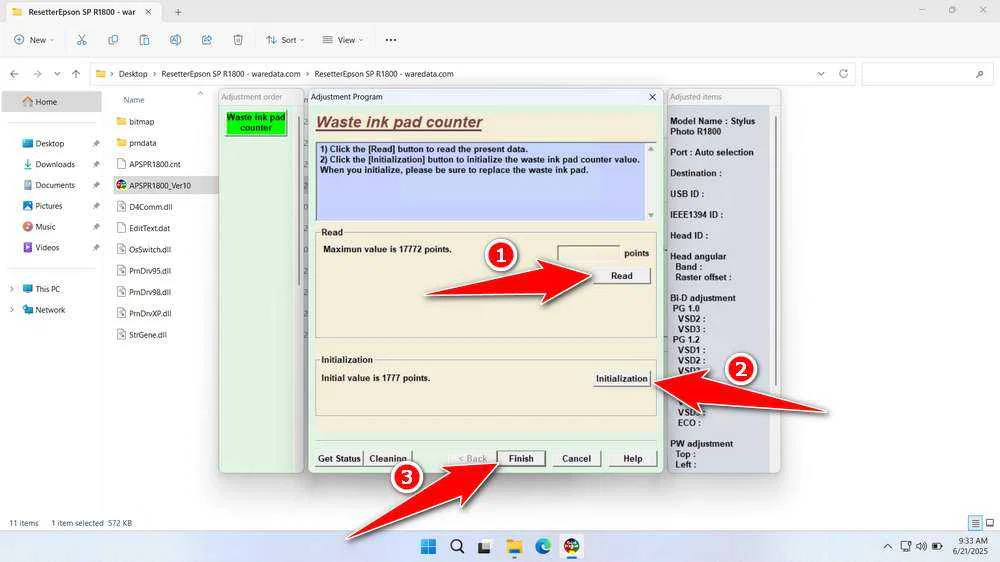
9. If the reset process fails, repeat the reset process by trying another USB port on the computer connected to the printer. Also, make sure the printer is on.
Download Epson Stylus Photo R1800 Resetter Here
Resetting is only a temporary software fix. The physical waste ink pads continue to absorb ink and will eventually saturate. Ignoring this leads to ink leakage, potentially causing severe internal damage. Resetting should always be followed by plans to inspect and replace the pads.
Once you understand what a resetter, waste ink pad counter is, how it works, and the risks involved, then you can use this resetter with caution and discretion. To download the Epson Stylus Photo R1800 Resetter can be done by visit the following link.
File Size: 588KB
File Type: .ZIP
OS Support: Windows 7/8/10/11 or higher
Maybe you like other interesting articles?

