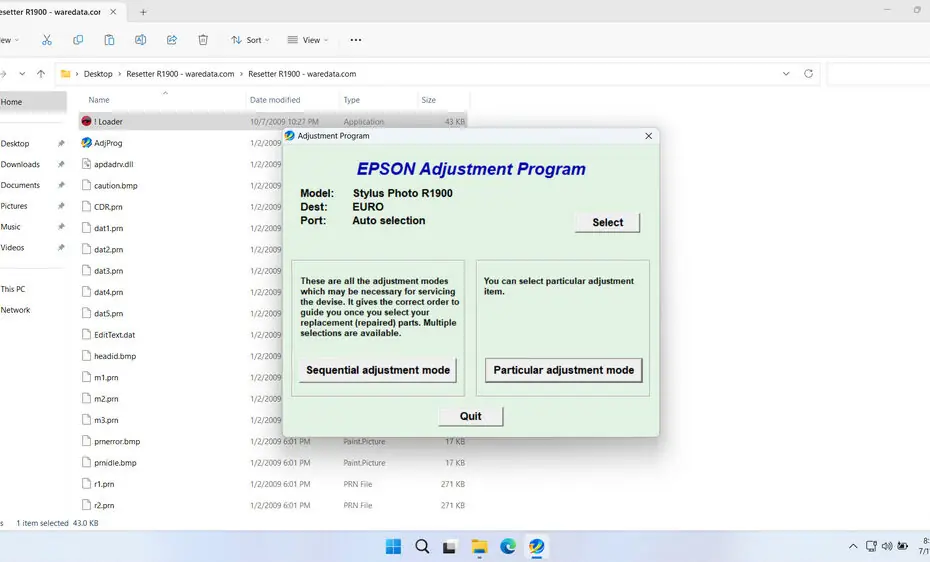
Epson Stylus Photo R1900 resetter is a software utility designed to reset the internal counters of your printer, particularly the waste ink pad counter. This specialized tool communicates directly with your printer’s firmware to clear error messages and restore normal printing functionality. The resetter essentially informs your printer that maintenance tasks have been completed, allowing it to resume normal operation.
When your printer displays error messages about waste ink pads or refuses to print, the resetter can often resolve these issues by clearing the waste ink pad counter, which is the cause of the printer not functioning normally when it occurs.
Below, we will explain in more detail what a resetter is, how you can use it, and utilize it to perform your maintenance. We will also provide you with a link where you can download this resetter.
Table of Contents
- What is Epson Stylus Photo R1900 Resetter?
- What is Waste Ink Pad Counter
- How Does the Resetter Software Work?
- How to Use Epson Stylus Photo R1900 Resetter
- Download Epson Stylus Photo R1900 Resetter Here
What is Epson Stylus Photo R1900 Resetter?
Epson Stylus Photo R1900 Resetter is a specialized software tool used to restore the printer’s internal counter and reset error messages related to the waste ink pad counter or maintenance warnings. It is particularly helpful when the printer displays messages like “Service Required” or “Ink Pad Is at the End of Its Service Life.” Resetting these counters accurately can allow continued printing without the need for costly repairs or replacement parts, provided the printer’s hardware is in good condition.
What is Waste Ink Pad Counter
During normal operation, your Epson R1900 performs cleaning cycles to prevent clogging and maintain print head health. A small amount of ink is flushed into a designated absorbent pad (the waste ink pad or absorber) within the printer. Epson engineers conservatively estimate the capacity of this pad and embed a software counter to track ink accumulation. Once the counter reaches its pre-set threshold, the printer locks down, signaling that the waste pad is “full” and requires service. In reality, the physical pad often still has significant capacity. The resetter addresses this software limitation by resetting the counter to zero, allowing you to continue printing until the pad physically needs replacement.
How Does the Resetter Software Work?
The resetter software functions by establishing a communication link between your computer and the Epson R1900’s service interface. Once connected (via USB cable and requiring the printer to be in a specific service mode), the software can:
- Read Counter Values: Display the current percentage or count of the waste ink counter.
- Reset the Counter: Set the waste ink counter value back to zero.
- Initialize EEPROM: Perform a deeper reset of certain printer memory settings (use with caution).
It bypasses the user-level controls, directly instructing the printer’s firmware to clear the counter flag that triggered the service error.
How to Use Epson Stylus Photo R1900 Resetter
1. Before you download and use Epson Stylus Photo R1900 Resetter, you should first disable the antivirus on your computer for a while. This is done so that the reset process can run smoothly, because often, antiviruses make detection errors. Also, make sure the printer and computer are well connected using a USB cable.
2. You can download the Epson Stylus Photo R1900 Resetter via the link we provide below this article.
3. After you download the resetter file, please extract the resetter file. The method is to right-click on the file, then select Extract All.
4. Open the extracted resetter folder, then please run the file called “!Loader.exe”, which is slightly different from other resetters. Click “Accept” afterwards.
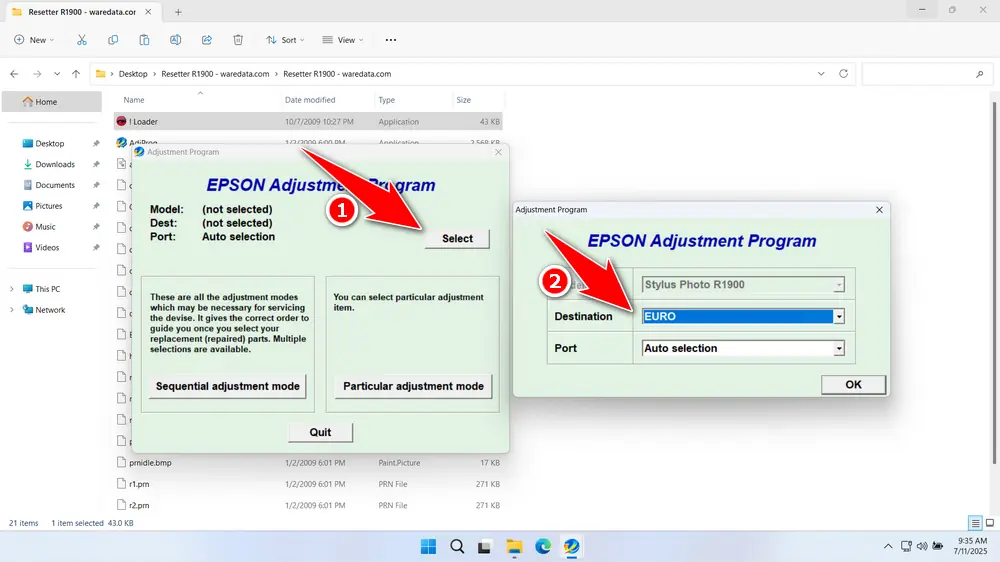
5. After the resetter program has successfully run, please click the “SELECT” button, select the destination, and then click “OK”.
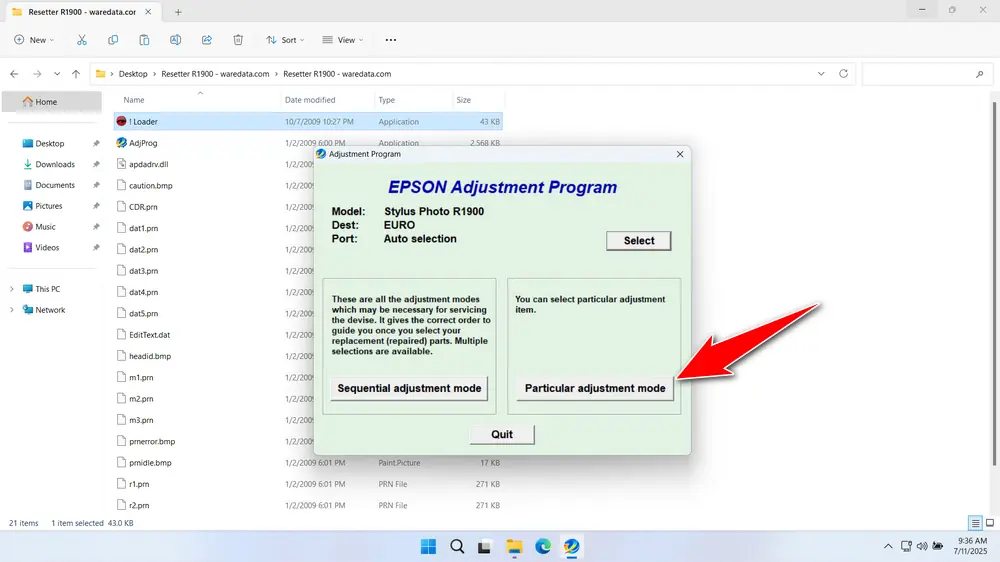
6. Continue by clicking the “Particular adjustment mode” button.
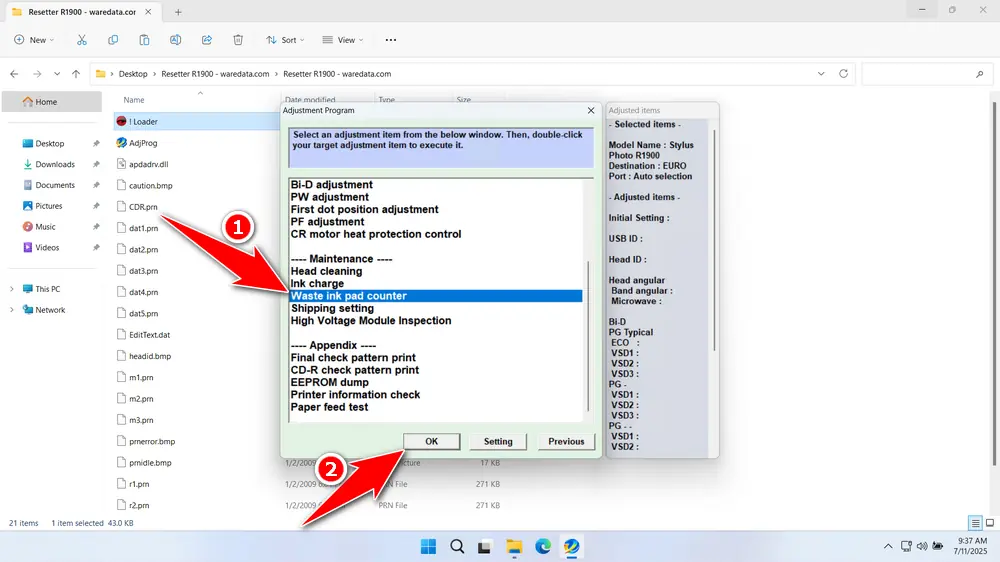
7. Select “Waste ink pad counter” in the Maintenance option. Then click “OK”.
8. Tick on “Pad counter of 0 xx” & “Pad counter of 80 xx” options, then click the ‘Check’ button, and continue by clicking the “Initialization” button. After a successful reset, click “Finish”. You can close the resetter program afterwards. Then turn off the printer, and then you can turn it back on the printer again.
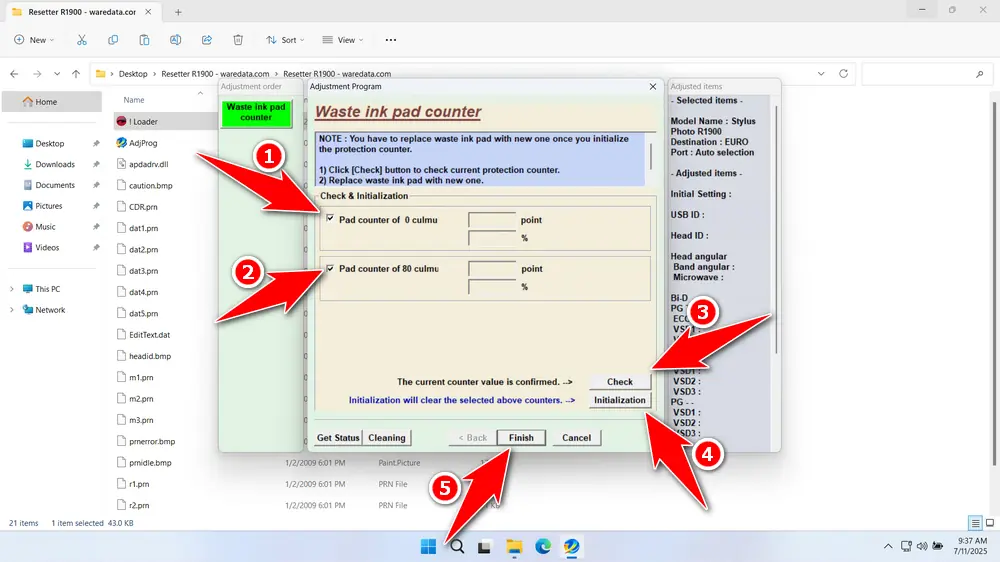
9. If the reset process fails, try moving the USB printer to another available port on your computer. Then repeat the reset process.
Download Epson Stylus Photo R1900 Resetter Here
Resetting the counter does not empty or replace the physical waste ink pad. Ignoring the physical saturation risk leads to ink leakage, potentially causing severe internal damage and electrical hazards.
If you already understand the benefits and risks of using a resetter program without caution, then we assume you have mastered the use of the resetter. If you need the Epson Stylus Photo R1900 Resetter, you can download it through the following link.
File Size: 1.3MB
File Type: .ZIP
OS Support: Windows 7/8/10/11 or higher
Maybe you would like other interesting articles?

